Welcome!

I will be documenting the construction of our pole barn home. We decided to build because we had been in the same mobile home for many years. The main reason I started this blog was to help others. When we first started out, we looked for information to help "Do It Yourself" people such as us but didn't find much on the web. With the exception of the concrete foundation work and enclosing the structure, we are doing all the work ourselves. But we have been blessed with family members and friends who have helped us a great deal. We broke ground in July 2006 and we moved in October 2007. If you want to read more about the details of our plans, click here.
Think of this site as a diary of DIY home construction.


Update January 2009:
Hi friends, I had made my blog private for some time but have decided to open it back up again. I was way too busy with other things. I am happy to report we have moved in but still have much to do to complete things. There is still trim to put up, some grouting to do, a few more floors to finish but more on this later. I am in the process of redoing this blog and just wanted to thank everyone for visiting :)

July 22, 2007

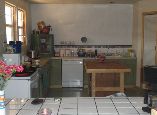
Close up photo of kitchen base cabinet


While I was painting our master bedroom today, I decided to take a photo of one of our kitchen base cabinets. I finished these myself and am pretty pleased with them. I painted them a pale olive color. The paint color is homestead resort pale olive (Valspar from Lowe's). We are going to use lots of shelves in our kitchen and not go with many upper cabinets. We're also going to build an island but that will be one of the absolute LAST items on our to-do list. We still have so much to do like putting on the trim on our recessed lights, install ceiling fans, installing the wood-burning stove...the list just doesn't seem to end.

Installed Kitchen Sink

Tonight we installed the Kohler cast iron sink. I know this thing has to weigh 80 lbs! This is a first for us but I think we did well.
The faucet set is Moen.

July 21, 2007

Painted Kitchen Today


Today I started painting the kitchen. I managed to get it all done except for the ceilings. The color I chose is antique lace which is a wal-mart (color place) color but I had them do the paint in Kilz. I really like the way Kilz covers and with us having done the drywall ourselves, let's just say that we can use all the coverage we can get.


July 20, 2007

Finished our son's bedroom floor

We liked how our guest room floor turned out so me and my son decided do the same to his floor.


I have yet to apply the poly.

July 18, 2007

Applying Poly to Paper Bag Floor

Last night I applied the polyurethane over paper bag floor in guest room. Right after that, I noticed I had problems. I had used a roller to apply the poly and in a few areas I noticed marks where I had missed. According to directions, there should be 5 hours in between coats so I'm going to apply the poly to those bare areas next. After that, I will do two more coats then be done. I'll post pics of the completed floor soon.

We will be texturing the entire kitchen tonight.

July 15, 2007

Brown Bagging Guest Room Floor


I heard of a technique last year
when I was searching for flooring choices. I saw a few pictures online and thought I could do this myself! I started doing the brown bag flooring today in our guest room. First, I had to make sure there was no mud on the floor and it was totally clean. Then I ripped up rolls of brown construction paper into various sizes and shapes. I then mixed tacky glue with water *about 60% glue to 40% water. I used a paint roller to roll the glue onto the paper and then stuck it to the cement floor. I was really surprised about how good it looked. Looks like stone! After I finish glueing the paper to the floor I will let it dry completely, I figure a day or more and then put 3-4 coats of minwax poly over it. If any of you know for sure how many coats I need, please let me know. I had read where most people put 4 coats on. I have taken pictures, but they turned out a little dark. I plan on buying a new camera before this blog is complete. I will take more pictures as I progress on this job. It's a good thing I have a gardener's knee pad.


July 12, 2007

No more texturing for now

After we sprayed our bedroom last night, we looked over all the rooms and made a list of what needs to be done before we take up the hopper again:


  • we need to do some more mudding on kitchen ceiling

  • bottom of bar needs a last mudding over tape and screws

  • washroom just off the master bath needs both mud and tape

  • area over the shower in master bath needs both mud and tape

  • our bedroom closet needs tape and mud in some areas

We plan on mudding ceiling of kitchen tonight and if we get done before dark, we will go on to work in the bathroom.


As an aside, I ran upon an old post of mine about a possible move-in date. It made me chuckle. In this particular post made on February 1 of this year, I stated that I was aiming for the middle of March! Shows what rookies at home construction know.

July 11, 2007

Textured master bedroom and painted another room


I spent most of the morning painting son's bedroom. Was able to get all done in there except ceiling. In the evening, we sprayed texture in our bedroom. We had some mud left in the hopper so we sprayed the arch going into the kitchen and one small wall. Moved all kitchen cabinets and countertops out of kitchen earlier in the day.


July 10, 2007

Textured living room and getting ready to paint...finally

This morning around 9:00 am, I started painting primer on the guest room walls. Son's bedroom was textured yesterday and I went to Lowe's to once again check on paint colors. I bought 2 gallons of paint for his room called, "Waning Moon". It is Valspar from Lowes. It was the nicest clean white I could find. I am horrible at making decisions on colors. After I get guest room primed, hopefully I will have picked out a color for that room as well. My order (if I can stick with it) of getting the rooms painted and primed is:


  1. 3 bedrooms


  2. kitchen


  3. living room


  4. bathrooms

Tonight we textured the living room.


July 9, 2007

Beginning to texture walls/ceilings


Well folks, last night we finally started to texture the walls in our guest room. We used a hopper (texture gun) and air tank. The texture we're applying is called splatter. I can say straight up that we had no idea what we were getting into. Most of our time was spent mixing the mud and filling the hopper. That thing is very heavy when full of mud! Tonight we're going to be doing the ceiling of same room and I'm really curious as to how much harder that will be than the walls were. It seems hard enough holding up that spray gun to do the walls. My poor hubby, he is handling the hard stuff (spraying) while I have the job of holding the gun/hopper while he refills it :) Had to take a trip to get more mud today. Bought 8 - 45 lb boxes. I will post pics of our guest room asap.
Photo of hopper similar to the one we are using.

July 8, 2007

Mudding Part 2


Well we were finally able to start back on mudding the interior of the house last night. We finished the back porch 2 days ago. Hubby managed to finish mudding all three bedrooms! He is going to start texturing *with the hopper* tonight. We've never done this so it will be all new to us, but then again, everything up to this point has been as well :) I have posted some pics I took this morning of the finished rooms.

Master bedroom ready for texture


July 4, 2007

More work on back porch/bath vanity


First off, I wanted to wish everyone a very happy Independence day! We are planning on spending it with family and friends :)
Now, on to our progress. Last night we continued with covering our back porch. When my husband was sorting out sheets of metal, he ran onto a huge ant nest! Those things were scurrying everywhere. To the left is a photo of the vanity we recently purchased for our master bath.

July 2, 2007

Started Metal Roof on Back Porch


Tonight we started in on the metal roof for our back porch. I helped some by handing the husband 2x4's and then went inside to clean a little. We had a mess from all the sawing he's done in the past few weeks. After we're done with the porch work we can go back inside and finish up mudding the ceilings and a few places in the bedrooms. Then after that, our plans are to texture the walls, (we're going to do orange peel texture). We've decided that while I am painting, hubby will be working on the plumbing. I plan on taking pictures and posting them here often.